docs
Developer's guide
Team Cloud Prime
Zed ChanceVictor Galbraith
Nick Fairneny
Emmanuel Castrejon
Kobe Charles
Cesar Arroyo
Table of Contents
- Introduction
- Implementation Tools and Technologies
- The
dev1machine - Embedded Player
- Advanced Search
- Appendices
Introduction
ReelRadio is a site dedicated to hosting radio “airchecks” from the 50s - 90s. The site’s main features are the ability to stream these audio recordings, and comment on them. he site has the ability to search through the various collections and exhibits.
This document will go into detail on how our team, Cloud Prime, was able to implement both the embedded audio player and the advanced search. Implementation details, as well as how to debug, will be included.
Implementation Tools and Technologies
The site uses a very common LAMP stack, that is:
- Linux (operating system)
- Apache (web server)
- MySQL (database)
- PHP (text preprocessor)
To experiment with other web server features, we also use nginx on the dev1 machine.
Other technologies include:
- JavaScript (embedded audio player)
- Python (audio transcription helper)
- Shell scripts (text scraper)
- Selenium (automated browser testing)
The production machine that hosts the site is rented from Linode, as well as the development machine (named dev1, details follow).
The development machine is a lesser powered but otherwise identical build to the production machine.
The site is version controlled with git, with remote repositories on GitHub. The actual site code repository is private, for client request, however some of the tools we used to implement our features are public (viewable here).
The dev1 machine
The dev1 machine was set up to alleviate the need for each team member to have to set up and locally host the site to work on it.
Each team member simply ssh‘d into the machine and did their work there.
This section will describe how we were able to work on the site simultaneously and independently.
The rest of this document assumes that you have access to the development machine. If your username is foo then login to the machine using
ssh foo@dev1.reelradio.com
and enter your password.
Where the site lives
The web server, Apache, serves files in the /export/dev directory using a hostname wildcard.
So, any folder inside the /export/dev directory, for example /export/dev/foo, will be served at foo.dev.reelradio.com.
This enables us to each clone a copy of the site repository, and work independently on the site, all in a fully live and deployed testing environment.
Setting up your own development branch
To start setup on your own copy of the site, first clone the site repository into /export/dev with a new name:
cd /export/dev
git clone git@github.com:reelradio/site.git foo
This clones the repository into /export/dev/foo (this repository is private, so access to the ReelRadio organization on GitHub is required).
Next, change to that directory and view the included README.md for exact details on how to get the site’s dependencies installed.
For brevity, the following is needed:
Install the PHP dependencies using composer:
composer install
This uses the composer.json and composer.lock file to create a vendor directory.
The site’s secrets are not checked into version control, so make a copy of the secrets file using the example file:
cp .env.example .env
and fill out the newly created .env file with the necessary secrets. Get these secrets from another team member (or check if they have the file already created in their directory).
The site repository is now set up, and the Apache web server will serve these files at foo.dev.reelradio.com, so if for example you are working on a file called bar.html, you can see the changes live at foo.dev.reelradio.com/bar.html in your browser.
Note: See tips for debugging the web server and how to check the status of the web server in appendix.
Making changes to the site
If a developer is working in the /export/dev/foo directory on a new feature in a file called bar.html, then the developer can view the changes live at the URL foo.dev.reelradio.com/bar.html in their browser. This allows the developer to test their features before committing changes.
git is used to version control the site.
The site’s main branch is considered stable, and should not be directly pushed to.
Instead, once ready to commit changes, create a new branch:
git checkout -b new_feature
Then stage, and commit the files
git add bar.html
git commit
Make sure to use a descriptive commit message, including task number if applicable.
Continue to work on the new feature in this new branch until complete, then open a pull request on GitHub (be sure to correctly choose the base of this pull request to be where you want your code to be merged, be it main or an intermediate branch).
Describe what the new feature does and if you ran into any problems in the body of this pull request.
Team members can comment and review the code, and changes can be made by pushing to this branch.
When the code is ready, the pull request can be merged, and the remote branch can be safely deleted.
When returning to your site repository to make new changes, make sure to check out main and pull before starting development:
git checkout main
git pull
Cleaning up branches
A useful command for cleaning up branches that have been remoted in the remote is:
git fetch --prune
MySQL databases
We use MySQL as our database management system. The dev1 machine has a database that has an identical schema to the production machine, with a subset of tuples, called zeddev.
This database is accessible with MySQL’s command line interface:
mysql -u foo -p zeddev
where foo is the username. You will be prompted for the password to the zeddev database, get this password from a team member.
View the available tables with:
show tables;
And describe each table with
describe table_name;
Otherwise, use SQL to query the database. A detailed description of the table schema can be found in the Advanced Search section.
Embedded Player
When our team started this project, the site used VLC player to play the radio exhibits. So, a rtsp link would start VLC player when a user clicked on an exhibit. The site comprises hundreds of collections, each with many exhibits. Each of these pages have links to start the radio exhibit. Because there are thousands of these links, we did not want to have to rewrite the entirety of them. This also allows us to preserve the old functionality, in case a user wants to opt out of the new player.
So to implement our embedded audio player, we essentially layer it on top of the old site inside an iframe, seen below.

While the user “browses” the site, the actual page never changes. Instead, the iframe loads the new page. When the user visits a page that contains the links to play exhibits, we use JavaScript to remove the anchor’s href, and add a function to the onclick event. This function requests the source URL for the exhibit and attaches it to the audio player, and starts the playback.
How to view the player
If a developer is working in the directory /export/dev/foo, then view the player at the URL foo.dev.reelradio.com/ram/embedded_player.html in your browser.
Upon load, the player will be hidden.
Navigate to an exhibit and click play to start an exhibit.
The player is revealed, loaded, and begins playing automatically.
Note: See minimum browser requirements in appendix.
Starting the player page at a different location
By default, the iframe loads the home page when visiting ram/embedded_player.html.
To start the page off at a different location, say collections.html, use the p parameter at the end of the URL, for example:
foo.dev.reelradio.com/ram/embedded_player.html?p=/collections.html
How the player is implemented
The player is implemented at the file ram/embedded_player.html, in the site repository. We located the file in the ram directory because historically this is where all of the scripts to play the exhibits go.
The general layout of this file is as follows:
- CSS styling
- JavaScript code
- Functions
$(document).ready(...)section, this code runs when the page is fully loaded$("#reel-content").on('load', ...)this code runs when theiframeloads a new page
- HTML body, this is where the
iframeand HTML audio player are
Function description
The main JavaScript functions used by the player are as follows:
makeRequest, this function requests a URL from the streaming engine using the filemediaRequest.php- If successful the return will be the URL and exhibit title as JSON. If not successful an error code will be returned (
401for not logged in,400for bad exhibit name)
- If successful the return will be the URL and exhibit title as JSON. If not successful an error code will be returned (
prepareMedia, this function attaches the exhibit source URL, title, and start time to the player. This function also shows the player if hidden, so the player appears on first play.playMedia, this function starts the audio player.rewriteUrl, this function takes in a pattern and an object. The function gets all anchors in theiframewhosehrefmatches the pattern and does the following:- Extract the exhibit name and start time from the anchor’s
href - Replace the
hrefwithjavascript:void(0)so the link simply does nothing when clicked - Add a function to the
onclickevent of the anchor, that callsmakeRequestwith the exhibit title, and the timestamp in seconds
- Extract the exhibit name and start time from the anchor’s
timestampToSeconds, this function takes in a timestamp from the exhibit links, and converts it to seconds using moment.jssetNowPlayingTitle, this gets the audio element and sets the now playing text to the exhibit’s title$(document).ready, this can be thought of as the main entrypoint of all of the JavaScript code. This function runs when the browser declares that the page is ready. A new Plyr.js player is set up here.$('#reel-content').on('load', ...), theiframethat loads the site is identified asreel-content, so this function runs each time theiframeloads a new page.- This function calls
rewriteUrlon a few different known patterns, and also sets the title of the page as well as the browser’s URL bar to the current respective values from the page in theiframe. This gives the user the illusion that they are browsing between pages when in fact they are never leavingram/embedded_player.html. - In addition, the player normally sits directly on top of the
iframeon the z-axis via CSS, when the page is scrolled down to the bottom we add margin to the bottom of theiframein order for the player to move below theiframeon the y-axis. This allows the users to see all of the content at the very bottom of the current page.
player.on('loadeddata', ...), this function runs when the audio player has fully loaded all data and sets theisLoadedflag to true.player.on('play', ...), this function runs when resuming from being paused. It checks to see if the player is already loaded, and if so it recallsmakeRequestwith the current exhibit and play time.player.on('ended', ...), this function runs when the player’s content ends, and sets theisLoadedflag to false.
The last 3 player functions described in the list above allow the user to play an exhibit, pause and leave for a while, then return and resume. The URL returned by the streaming engine is only valid for the duration of the exhibit plus some padding time, so by re-requesting the URL the user is able to continue playback.
How to debug the player
One simple way to see that something in the player is going wrong is if the URL bar is never rewritten from the original ram/embedded_player.html link. So, if this is happening you can be sure that the code to rewrite the URL bar is never being reached. Check your browser’s JavaScript console for any errors. If you need to check the logs of the web server see the Tips for debugging the web server section.
Note: See tips for debugging JavaScript in the appendix.
Where to add functionality to the player
The last 3 functions described in the list of Function description are specific to the Plyr.js object, called player. So, if looking to add functionality on these specific events, this is where it should go. Otherwise, follow the flow of code starting in $(document).ready(), as this acts as our main entrypoint for the script.
View the Plyr.js README for a comprehensive look at the API available.
Advanced Search
The site contains hundreds of collections, each with a biography of a radio DJ. Each exhibit has a short description of the radio broadcast. We wanted the users to be able to search all of this information, so we created a program to scrape the text from the site and dump it into a searchable database.
Bootstrapping the MySQL database on a new machine
These steps need to be followed in order to set up the databases for the advanced search feature. More detailed descriptions of how these tables were created are in the following sections, but to get the feature up and running follow these steps:
Add the FULLTEXT index to the existing exhibits table
In order to sort the results of the exhibit title query by relevance, a FULLTEXT needs to be added to the existing exhibits table. To do that, run this command in MySQL:
ALTER TABLE exhibits ADD FULLTEXT(title);
Create the tsearch table
To create the tsearch database, clone the reelradio/text-search repo onto your new machine:
git clone git@github.com:reelradio/text-search.git
Run the create_tsearch.sql file to create the table, and the insert_tsearch.sql to populate it in MySQL:
\. create_tsearch.sql
\. insert_tsearch.sql
Creating the vsearch table
To create the vsearch table, clone the reelradio/transcribe repo onto your new machine:
git clone git@github.com:reelradio/transcribe.git
Run the vsearch.sql file in MySQL to create the vsearch table and populate:
\. vsearch.sql
The search.php file
The search.php file is where users are navigated to use our advanced search feature. When a user types in their query and runs a search, a call to perform_search.php (where our search query is handled and returned) is made using JavaScript. The results are then displayed to the screen, ordered by relevance.
Description of database schema
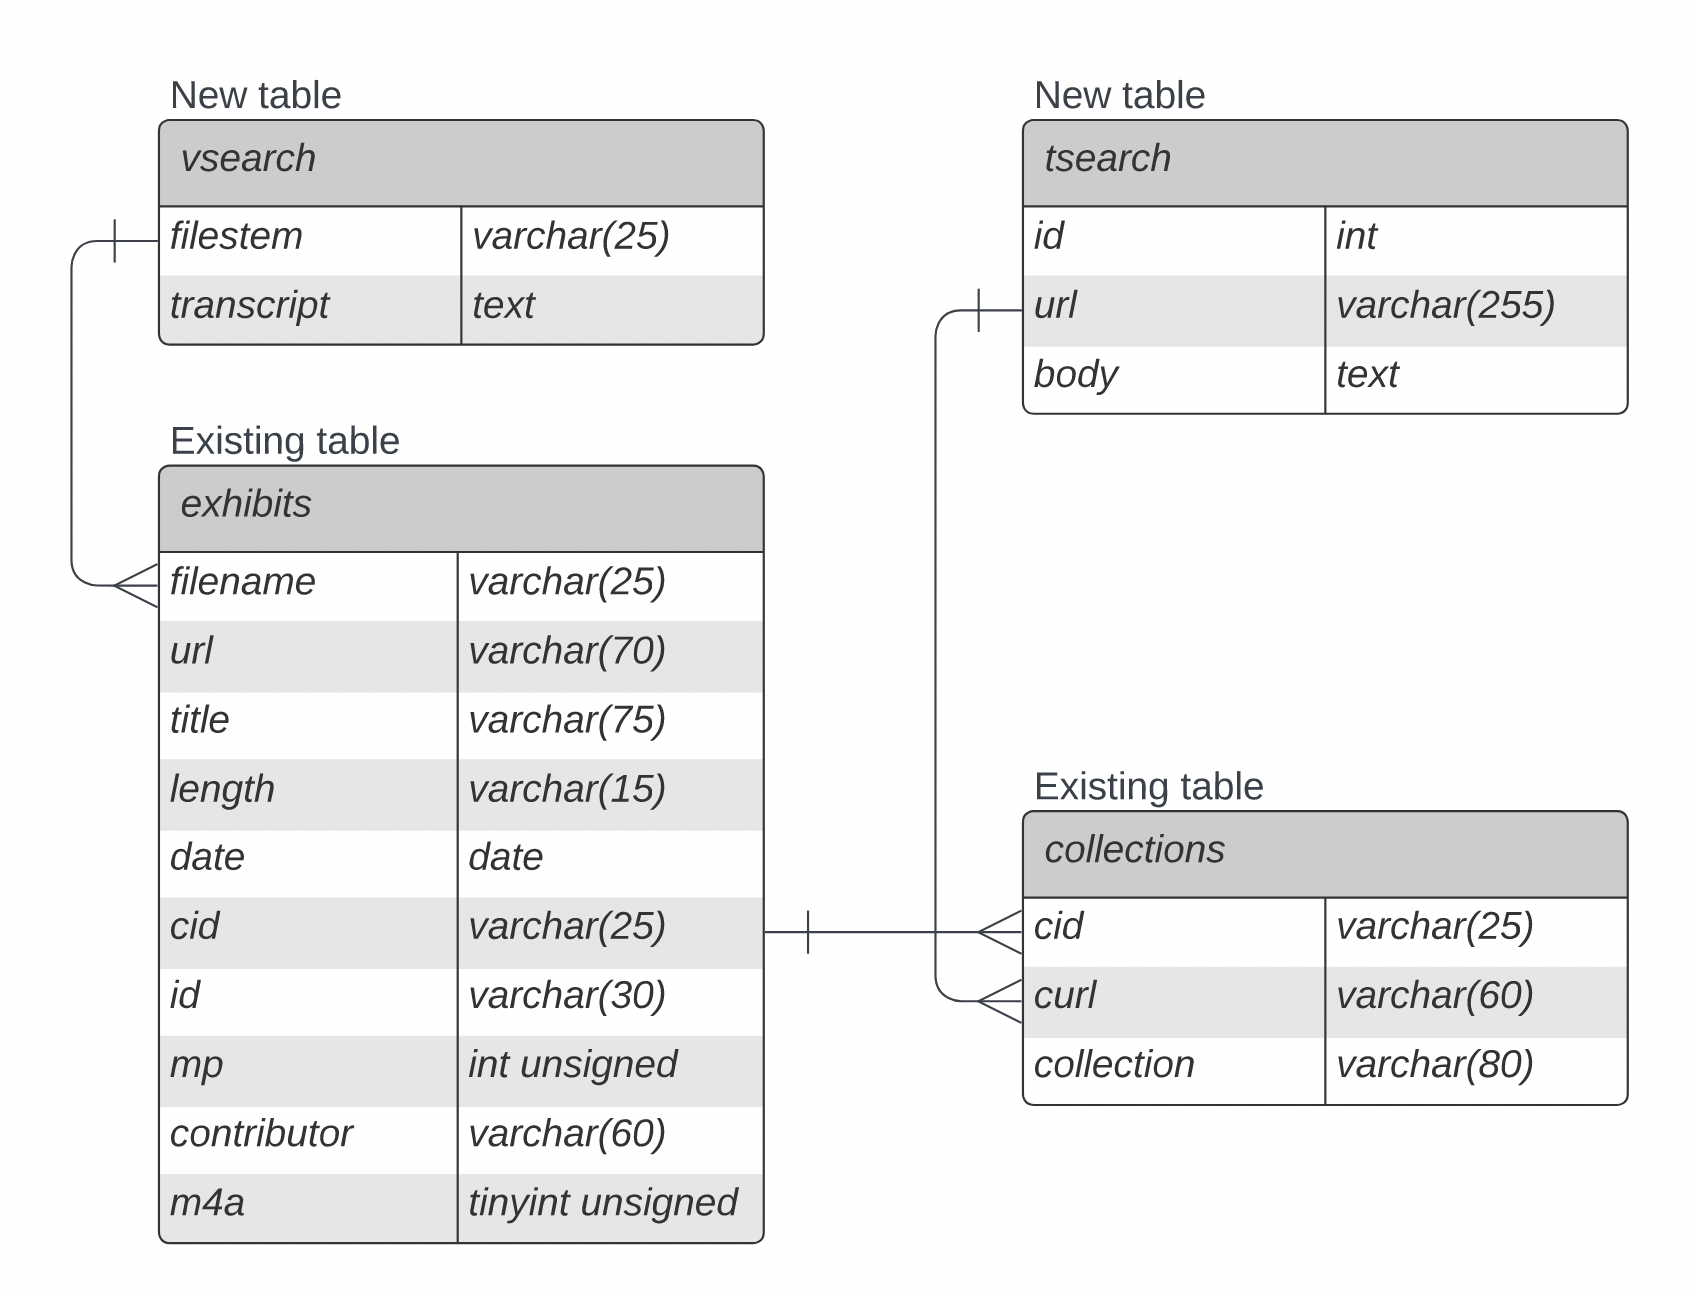
We built on top of the existing database, of which there were 2 tables which we tied into; collections and exhibits.
We created 2 new tables; the tsearch table was built from scraping the collections pages for text, and the vsearch table was built from processing audio files through a transcription service.
We associated the scraped pages in the tsearch table to their collections in the collections table, and associated the transcriptions in the vsearch table with the exhibits in the exhibits table.
This allowed us to search both of the new tables for relevant matches, and return the associated titles, urls, etc.
How we generated the tsearch database table
A shell script was used to scrape collections pages and dump the contents into the database.
To create the tsearch table
The file create_tsearch.sql is used to create the table.
In MySQL, run
\. create_tsearch.sql
to create the table.
To scrape a page
Run
./scraper url
where url points to the page you want to add to the table. This inserts a line in the insert_tsearch.sql file. Once the insert_tsearch.sql file is fully populated, run
\. insert_tsearch.sql
in MySQL to insert all rows into the tsearch table.
To scrape multiple pages
./file_scraper filename
where filename is a text file that contains a list of URLs that you want to scrape. Each URL must be separated by a new line.
Running a query
The tsearch table is set up with a full text index, so instead of using the LIKE keyword in MySQL, we can use MATCH and AGAINST. For example,
SELECT url
FROM tsearch
WHERE
    MATCH(body)
    AGAINST('query goes here');
How we generated the vsearch database table
A Python script was used to process .m4a audio files into transcripts to be added to the database and make them searchable. To process more .m4a audio files, please follow the directions below.
How it works
Uses ffmpeg to convert an .m4a file into a .flac file (single channel, 16000 Hz)
- Uploads the
.flacfile to a Google Cloud Storage bucket (required by Speech-to-Text for audio files over 60 seconds) - Deletes the
.flacfile from the local machine - Transcribes the uploaded
.flacfile, saving the transcript as a.txtfile, while also building a MySQLINSERTstatement and appending it to thevsearch.sqlfile. - Deletes the
.flacfile from the Google Cloud Storage bucket - Simply log into the database and run the updated
vsearch.sqlfile to add additional transcripts into the database.
Set up your Google Cloud project
- Sign in to Google Cloud Console
- Go to the project selector page and create a project
- Enable the Speech-to-Text API
- Create a service account for your project
Note: the account needs to have at least Storage Admin access in order to upload to the bucket on Google Cloud.
-
Create a JSON key for your service account
Select your service account, navigate to the KEYS tab, and select ADD KEY (Create new key)
This will download a JSON file to your machine, you’ll need to know where this is later.
-
Create a Google Cloud Storage bucket
Note: Do not use a nested bucket.
How to use
- Pull the reelradio/transcribe repository to the same machine as your audio files.
-
Edit
transcribe.pyand setBUCKET_NAMEto the name of your Google Cloud Storage bucket:
-
Using a linux command line, set your authentication environment variable:
export GOOGLE_APPLICATION_CREDENTIALS="KEY_PATH"setting
KEY_PATHwith the path to your JSON key file, for example:export GOOGLE_APPLICATION_CREDENTIALS="/home/user/Downloads/service-account-file.json" -
Call
transcribe.pyfrom the command line with the path to the audio file as an argument:python3 transcribe.py path/to/file_name.m4a -
There may be a few installs required:
 sudo apt install python3-pip
 pip install --upgrade google
 pip install --upgrade google-cloud-storage
 pip install google-cloud-speech
 sudo apt install ffmpeg
Transcribe in batches
If you wish to loop over multiple .m4a audio files for processing, a shell script vloop.sh was created to facilitate using pattern matching to transcribe batches with a single command.
Edit vloop.sh to declare the following:
-
Set the starting pattern
starting_pattern="abc"(this will match all
.m4afiles starting with the string"abc") -
Set the
KEY_PATHwith the path to your JSON file, just as beforecred_path="/home/user/Downloads/service-account-file.json" -
Set the
FILE_PATHwith the path to your audio files to processFILES="audio/m4a" -
Call
vloop.shfrom the command line:./vloop.shvloop.shdoes 2 passes, first transcribing all the scoped exhibits matching your specified starting pattern, then matching the remaining exhibits. Duplicates are avoided by checking thetxtfolder for an existing transcript, scoped or unscoped.
Troubleshooting
Google Cloud’s Speech-to-Text can be tricky to get set up correctly.
- If the process fails during audio conversion, make sure the original audio files are in
.m4aformat. Conversion from other formats is not currently supported. - If the process fails during upload to your Google Cloud Storage bucket, make sure your service account was granted at least Storage Admin access.
- If the process fails during transcription, make sure the file path to your JSON key is correctly set and that Google Cloud’s Speech-to-Text API is activated. Wait a few minutes before trying again.
Note: See appendix for additional resources on vsearch.
How we allow for full-text search
The FULLTEXT index on vsearch, tsearch
MySQL allows for full-text search by declaring a column in your table as FULLTEXT, and works with CHAR, VARCHAR, or TEXT data types, see below:
CREATE TABLE vsearch(
    filestem VARCHAR(25) NOT NULL,
    transcript TEXT,
    PRIMARY KEY (filestem),
    FULLTEXT (transcript)
);
This then allows a query to be made using MATCH(full-text column name) AGAINST (query), as below:
SELECT
    url,
    title
    MATCH(transcript) AGAINST(query) AS relevance
FROM
    exhibits,
    vsearch
WHERE
    MATCH(transcript) AGAINST(query)
    AND
    filename LIKE CONCAT('%', filestem, '.r%')
;
with the added benefit of returning a relevance score, which we then used to prioritize which results are displayed first.
The query that the advanced search performs
We ended up using a query that combines 3 searches:
- First, one that uses full-text search to query the
tsearchtable of scraped collections pages - Second, another that uses full-text search to query the
vsearchtable of transcriptions - Third, one that does a limited keyword search on titles, as the site’s original limited search contained when we took on the project.
We combined these 3 and ordered the results by relevance, making for a much more powerful search feature. See below:
SELECT
    url,
    MIN(title),
    MIN(result_type)
FROM (

    -- query the tsearch table of scraped collections pages
    SELECT
        url,
        collection AS title,
        MATCH(body) AGAINST(query) AS relevance,
        ' ' AS result_type
    FROM
        collections,
        tsearch
    WHERE
        MATCH(body) AGAINST(query)
        AND
        curl LIKE CONCAT('%\"', SUBSTRING(url, 2), '%')

    UNION

    -- query the vsearch table of transcriptions
    SELECT
        CONCAT('/', SUBSTRING(url, 10, CHAR_LENGTH(url) - 11)) AS url,
        title,
        MATCH(transcript) AGAINST(query) AS relevance,
        '(transcription result)' AS result_type
    FROM
        exhibits,
        vsearch
    WHERE
        MATCH(transcript) AGAINST(query)
        AND
        filename LIKE CONCAT('%', filestem,'.r%')

    UNION

    -- query as keyword search on exhibit titles
    SELECT
        CONCAT('/', SUBSTRING(url, 10, CHAR_LENGTH(url) - 11)) AS url,
        title,
        MATCH(title) AGAINST(query) AS relevance,
        ' ' AS result_type
    FROM
        exhibits
    WHERE
        MATCH(title) AGAINST(query)

    ORDER BY relevance DESC
) AS sub
GROUP BY url
;
Appendices
Debugging
Tips for debugging JavaScript
The simplest way to debug JavaScript is to print things to the console. For example,
console.log("view me in the browser’s console");
Some browsers allow you to print out a JavaScript object and interact with it, for example if working with a Plyr.js object named player:
console.log(player);
Alternatively, if trying to debug on a mobile device, the easiest way is to use alert. For example,
alert("this opens an alert window!");
Tips for debugging the web server
Apache stores its logs in /var/log/apache2, so to watch the error logs while making changes to the site, use this command:
sudo less /var/log/apache2/reelradio-error.log
Enter your password when prompted by sudo, and then press F (capital f) to watch for new entries.
If the files are being served by nginx, the logs are in /var/log/nginx, so to watch for errors use this command:
sudo less /var/log/nginx/error.log
How to check the status of the web server
If something goes wrong, to check if the Apache web server is up run this command:
service apache2 status
Or if the files are being served by nginx:
service nginx status
Software requirements
Minimum browser requirements for embedded audio player
The embedded audio player needs a browser that supports Media Source Extensions. A detailed list of browsers that support MSE can be found at https://caniuse.com/mediasource
The most common browsers supported are:
- Microsoft Edge (all versions)
- Google Chrome (at least version 23, released in 2012)
- Safari (at least version 8, released in 2014)
- Firefox (at least version 42, released in 2015)
- Internet Explorer (at least version 11 on Windows 8+)